
Writing large amounts of data on-chain can be daunting for engineers working with blockchain applications. Not so with Avalanche L1s. This article guides developers to overcome this challenge and write data at scale onto a blockchain.
Writing large amounts of data on-chain can be daunting for engineers working with blockchain applications. Most blockchains use fees to prevent developers from sending many transactions. Not so with Avalanche L1s, which empower network operators to use their full capacity without any rate limiting. The challenge is then to take full advantage of the available throughput. This article guides developers to overcome this challenge and write data at scale onto a blockchain.
Avalanche L1s have emerged as a leading scaling solution in Web3. L1 blockchains are becoming the industry standard for high-throughput gaming, institutional finance, and enterprise applications. AvaCloud makes it extremely cheap and easy to build your own custom L1 blockchain.
Many projects that utilize L1s build their applications quickly and seamlessly, but they struggle to maximize throughput. A clear sign your network is not running at full capacity is when block space is not maximized (ie. blocks are not full). This is usually a sign that your transactions are not efficiently sequenced and submitted on-chain. Once those issues are fixed, the only other limiting factors are node CPU and RAM.
Transactions per Second (TPS) are limited by both the network configuration and physical machine size. In the following sections, we cover how to optimize all other system parameters to consistently run your application at maximum capacity.
Challenges
Many projects begin testing their blockchain applications by issuing transactions sequentially from a single signer. If you do this, you are almost guaranteed to reach a cap of 6 - 7 TPS. This is entirely due to the inherent latency of the RPC API service. It is neither a shortcoming of the L1 nor the AvalancheGo client.
Transaction Issuance Latency Diagram
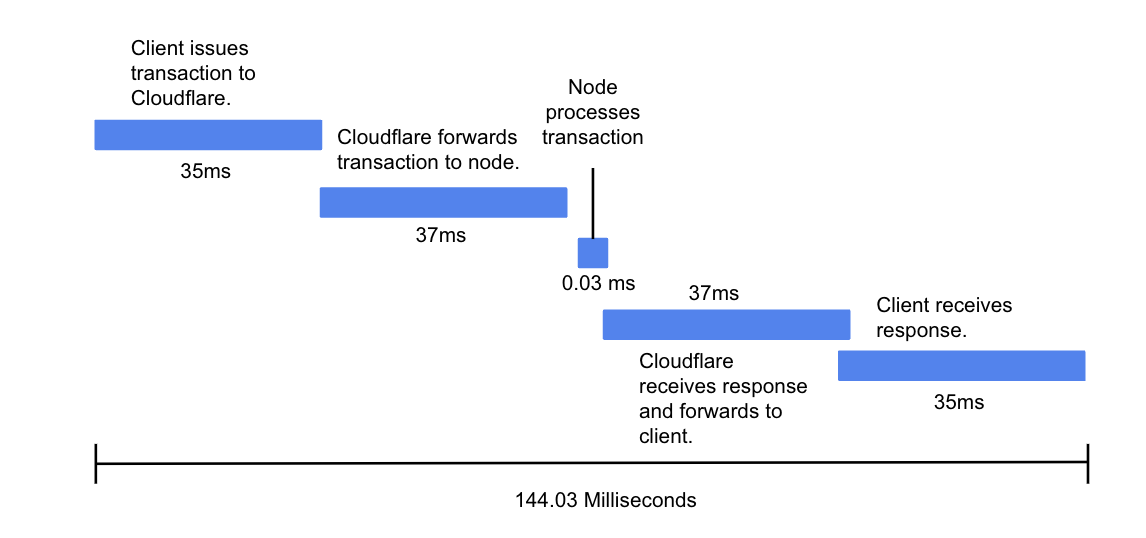
The diagram above shows the round-trip latency for a client to issue a transaction to the blockchain and receive a response. With a single API node, the entire process on average takes 144 milliseconds of which only 0.03 milliseconds is due to the AvalancheGo node processing. If you add additional API nodes for security and redundancy (recommended for production applications), the Cloudflare forwarding time will increase and further slow the system.
Let’s assume we have a system with a single API node. The default block time on an Avalanche L1 is two seconds meaning one block will be processed at least every two seconds. As previously established, we can only submit one transaction to the chain every 144 milliseconds. So, we can fit at most 13* transactions in a single block. Therefore, the average peak throughput is 6.5 TPS**.
In summary, issuing transactions sequentially while waiting for an API response is a safe strategy for ensuring reliable transaction acceptance and finalization. However, you will be capped at a significantly, and sometimes prohibitively, low throughput for your application.
Let’s explore some alternatives and the associated risks that can solve this low throughput problem. These alternatives are not mutually exclusive nor listed in any particular order. The alternative(s) you select should be based on your specific needs for your use case.
Parallelizing issuance from a single signer
The previous section describes the limit on a single signer if it is forced to wait for a response from the API. However, it is possible to issue transactions asynchronously from a single signer to achieve much greater throughput. Instead of issuing transactions one at a time and waiting for a response, you can issue many transactions concurrently. With this strategy, it is possible to issue enough transactions simultaneously to fill the blocks on your L1***.
However, there are technical complexities with this alternative. When implementing this solution, you might encounter a seemingly bizarre phenomenon where transactions “disappear” after issuance and never get processed in a block. This is due to two chain configuration parameters in AvalancheGo, tx-pool-account-queue and tx-pool-account-slots (for more information, see the documentation). These parameters specify the maximum number of transactions that can be present in the mempool from a single address. With concurrent transaction issuance, it is possible to exceed these limits. When the limit is exceeded, transactions with the highest nonces will get dropped from the mempool. If you do not account for this drop, you will keep issuing transactions that never get processed until the nonces that were dropped are reissued.
For example, when using the default**** parameters, the following situation might occur.
You issue 100 transactions concurrently. Transactions with nonces 1-80 will get processed on-chain, but the limit will be reached and nonces 81-82 might get dropped. However, nonces 83-100 arrive after transactions 1-80 get processed so they remain in the mempool. You will only see 80 transactions on-chain instead of the expected 100. If you reissue new transactions one at a time, you will end up reissuing the transactions with nonces that were dropped (81 and 82). Nonce 81 will get processed by itself, yet nonces 82-100 will get processed at the same time even though you only issued one transaction (nonce 82).
Now that you understand what is going on under the hood, you can spot this otherwise complex pattern, adjust your system in a way that takes these parameters into account, and improve the consistency of your network’s performance.
Increase the number of signers
There is another simple solution that avoids dealing with the complex nonce management and mempool dynamics risks described above. Given the system bottleneck on one signer, increasing the number of signers is a viable alternative. By parallelizing the transactions across multiple signers, you can increase the peak TPS of your L1. For example, if you are issuing 1000 transactions with one signer, it is possible to achieve the same result on-chain by issuing 250 transactions each from four signers simultaneously. This would effectively quadruple your throughput. Ultimately, using multiple signers allows you to issue transactions faster with a significantly lower risk of facing nonce management issues and transaction drops.
However, increasing the number of signers might not work for your specific use case. This alternative can be difficult to manage as you must keep track of many signers issuing transactions concurrently. Depending on your wallet provider, it can also be expensive as you might pay on a per-signer basis. Furthermore, this alternative would add complexity to your backend architecture. You would need a load balancer to manage multiple backend server instances. If nonce management is in-memory, each instance must control an exclusive set of signers. If nonces are managed in a database, you must ensure that nonce read and increment operations are atomic.
Configure gas parameters
When creating an Avalanche L1 blockchain, you can customize various aspects of your blockchain using features such as precompiles. One such precompile is the Fee Manager. With this feature, the admin wallet can determine and change the gas fees on your blockchain. The two gas fee variables that have the largest impact on performance are the gas limit, the maximum amount of gas that fits in a block, and the gas target, the expected amount of gas consumed in a rolling ten-second period. A default AvaCloud L1 has an eight million gas limit and a 15 million gas target. In other words, this configuration allows for at most 42 NFT mints per block*****.
By increasing the gas limit, you can fit more transactions into a single block which in turn increases your max throughput. Increasing the gas target has the same effect; if the targeted amount of gas is not consumed, the dynamic fee algorithm will decrease the base fee until it reaches the minimum. Thus, more transactions will be processed until the targeted amount of gas is met.
With the Fee Manager precompile enabled, you can change the gas configurations through the AvaCloud portal. The gas options are low, medium, and high which translate to a gas target of 15, 20, and 50 million respectively.
If you would like to negate the impact of dynamic fees on your network, you can set the gas target to be more than 5x the block gas limit. Additionally, you can use EIP 1559 type transactions to continue sending transactions until fees reach your specified max fee.
There is a long-term risk of increasing your gas parameters. By allowing more transactions to occur on your network, the network state will increase at a faster rate. There is potential for state bloat to occur where it might become prohibitively expensive to run infrastructure for your L1. Thus, it is essential to understand the tradeoffs that come with customizing the gas parameters and to monitor state growth on your blockchain constantly. Unfortunately, modifying gas parameters is a short-term solution, as state database growth is a long-term problem for all EVM chains.
Batch transactions
With the EVM, it is possible to combine multiple transactions into one transaction to be processed on the network. For example, if you want to mint ten NFTs, you could make a “batch-mint” function call that will get processed as one transaction by the network. So, even though that one transaction might get processed at six TPS, you essentially achieve 60 TPS.
The risk here is the same as above; in the long term, your network will eventually reach an unmanageable database size. However, batching transactions is both more resource and space-efficient, so there is little downside when compared to not batching.
Issue transactions to a self-managed node
The final alternative is to issue transactions to your own local RPC node. This solution will drop issuance latency to ~0.03 milliseconds (as shown in the diagram above), thus enabling you to fill the blocks on your blockchain with a single signer issuing transactions synchronously. However, this alternative is impractical in production settings as your service will be responsible for auto-recovery of the node in case it goes down. It is also not recommended to allow external users access to a dedicated endpoint on your node instead of a public endpoint with load balancing and DDOS protections. This is only an option for connecting a back-end service that you control. As an AvaCloud client, you have the option to purchase a managed dedicated node that only your application can connect to.
Going beyond the EVM
By understanding the tradeoffs that each optimization entails, you can determine which is best suited for your particular application.
Soon, HyperVMs (virtual machines built by the HyperSDK) that can process 100,000+ TPS will be leveraged by L1 blockchains wishing to avoid the scaling limitations of the EVM. Some advantages introduced by the Hyper SDK include nonce elimination, native account abstraction, parallel and concurrent transaction execution, and industry-leading state management with a purpose-built database. Unlike the EVM, HyperVMs can provide applications with enormous scalability from launch which is necessary for many institutional finance and payment applications. Additionally, it is the best path forward for the long-term scalability of existing projects that start on the EVM but expect to outgrow it.
While HyperVM’s are the future, many projects may migrate once they receive significant traction on their EVM-based application. Thus, it is still important to understand how to get the most out of your EVM L1s today.
* 2 seconds divided by 144 milliseconds per transaction = 13 transactions.
** 13 transactions per block divided by 2 seconds per block = 6.5 transactions per second. Note, this peak will vary as 144 milliseconds is an average throughput.
*** When you fill the blocks, you achieve the maximum possible throughput on your L1 given its gas parameters.
**** Tx-pool-account-queue is set to 64 and tx-pool-account-slots is set to 16
***** Using an NFT contract that consumes 187,000 gas per mint
For any additional questions, please view our other knowledge base articles or contact a support team member via the chat button. Examples are for illustrative purposes only.